ENJOY!
Going out to eat on vacation is certainly a highlight for most people. However for my daughter Naomi-Ruth (6) it can be a bit confusing and scary. You see since birth she has endured food allergies and tolerances to gluten, wheat, dairy, eggs, red food dye, and most recently life-threating reaction to peanuts and tree nuts. Needless to say, dining out for her requires a lot of planning and knowledge.
It does seem more and more that local restaurants have gluten or dairy free options, and many places will let you look at the ingredient listings. Just going to Mc Donald's is a small feat, but imagine being away from home on vacation for over a week?
This is one reason why my family continually travels to Walt Disney World in Florida. This place gets it and caters to children and adults like my daughter with such ease and knowledge it can be a little less stressful figuring out what she can eat while we are there.
Just recently we went to Walt Disney World in June for a week. Before we went, I checked menu lists on allears- dining menus and checked the allergy reference lists from glutenfreedairyfreewdw.blogspot reference sheets
I made lists of brands that I knew she could have and jotted down items that we could order off the straight menu or would need to get specially prepared. In an attempt to help another guest who may be curious about how to order and what are the options but not to overwhelm you with EVERYTHING...below is a small reviewin my daughters perspective, with descriptions from myself and pictures too.
" I love going to Disney World! I like Its a Small World, the Haunted Mansion, and the Ariel Ride (the new Under the Sea ride in the Fantaslyland Expansion).
[when asked what do you like to eat there?]
Mickey waffles, fruit, fries, and treats. Disney makes me my own special food [big smile]
We ate in Italy for lunch and the nice cooker [chef] made me my own pasta and I had the best rolls ever!
So how does one go about ordering a special allergy free meal at a Table Service Restaurant at Disney? The first thing to do is INFORM. You can either note the allergy needs online or over the phone when you make your dining reservation and/or inform your server upon being seated. Next step EXPLAIN (in detail) before you order your meal, either the head chef or manager of the restaurant will come to your table and go over what food items the person in need CAN NOT have. They will describe what offerings they do have and you can decide on a meal together. Sometimes it is a completely custom made meal or a version of an item on the existing menu.
At Via Napoli in Epcot, we were able to get pasta that was gluten, dairy and egg free, sauce on the side, diced plain chicken, and her own rolls made with tapioca.
As you can see in the picture above the portions were quite generous and my daughter was beyond delighted.
I also got to eat in Belle's ballroom and had steak and green beans, fries too!
I couldn't eat the grey stuff so I fed it to my Mom, she said it was delicious
Again at Be Our Guest restaurant in the Magic Kingdom, we INFORMED our server, and the chef came to our table and we went over her needs and ordered the perfect meal. She even received her own basket of tapioca rolls. She couldn't drink the fancy juice fizzy drink, but our server was able to give her same plain juice to drink in that fancy light-up cup her grandmother bought her.
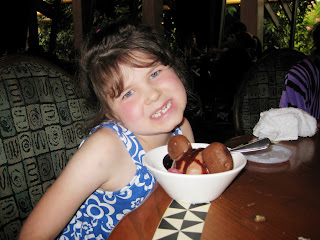
My favorite dessert was the Mickey sundae, it had two cookies. I didn't have to share with anyone
This dessert was presented to her at O'Hana in the Polynesian resort after our dinner there. It was a huge scoop of dairy free ice cream ( they had chocolate or vanilla) and two Enjoy Life chocolate brownie cookies, plus special chocolate sauce. I was quite impressed.
I like smoothies, I got a blue one while we watched the fireworks
One night in the Magic Kingdom we stopped for dessert at the Counter Service stop called Sleepy Hollow. We ordered her the Liberty Swirl Slush-a combination of Fanta strawberry and blue raspberry NOTE: yes this most likely has red food color #40 in it, but it was shortly after this trip that we realized this dye was causing a skin irritation for her, I think she drank a gallon of red Kool-Aid at my Aunts)
I like hamburgers especially when I get a bun! it was the best bun ever. I even told the food person that
On our first day, we had lunch at Contempo Café inside the Contemporary resort. At this Counter/Quick Service location there are ordering kiosiks, where the guest handles the ordering process themselves. Typically at at Counter Service when you need a special order item, the guest needs to speak with the manager first, in which you would INFORM your order taker. At this place you can go up to the pick up window and let them know. Sometimes this process can take awhile, depending on how busy the restaurant is. Luckily for us, the manager was right there. We INFORMED and EXPLAINED to the manager we'd like to order a hamburger NO bun unless they could accomadate Naomi-Ruth's allergies. And as you can see in the picture above they could. Her order took no longer than the rest of our food.
Another quick service example I had in ordering for her was in Epcot at the Liberty Inn. Our family had started out late that day and decided to eat in the park unplanned, not a bad idea but tricky for Naomi-Ruth. I asked her what she wanted to eat and I'd try and find it. She said she really wanted a hot dog. I used my iphone and quickly brought up the menu list via allears again. I saw they had hotdogs with toppings on the adult menu, so I kept my fingers crossed and headed over there, while the rest of the family was eating in France.
Luck was on my side as the ordering lines were short and I asked to speak to a manager to order an allergy free meal. I told the cast member what I was looking for "a hot dog meal" and what the allergies were. She basically put together a custom order for me of a plain hotdog, tapioca hamburger bun (since they didn't have gluten, diary AND egg free hotdog ones...and I knew Naomi-Ruth wouldn't mind) plus some sides, which included fries in a dedicated fryer. I probably waited less than 10 minutes for my order to be up, which resulted in one happy girl.
her response:
this is a weird hotdog bun, but I like it, thank you Mommy I love you
In the end, we had no complications with ordering for her, with a little pre planning and know how, you can do this too. Naomi-Ruth's next Walt Disney World trip is coming up very soon in September and we are already making her food wish list. Oh and she did get those Mickey waffles, a special plate of her own was delivered to our table by the head chef at Chef Mickey's in the Contemporary Resort (please note Mickey didn't actually bring the waffles)
thanks for reading, Julie


